
Hello everybody!
In this guide I'm sharing with you how to create a C++ Wasm module in Visual Studio, how to build it using CMake and Emscripten, and how to test it in the Emscripten HTML test page.
Check the GitHub of both projects:
After this guide, I will share with you another one showing how to consume the Wasm Module in a Browser Webpack project with full control over it.
Lets do it step by step, lets start!
Motivation
In my early years as a programmer I used to create Windows video games and native applications. My preferred IDE was Visual Studio and I used to develop in C++.
After many years programming, and somehow (don't ask me how), I ended up programming Web and Server applications in Typescript. Bit after bit I left back C++ and Visual Studio but yeah, I can say I miss them a lot! Saddly the huge amount of things to learn for Web and Server applications don't let me time to continue with C++ and Visual Studio.
Now, and thanks to WebAssembly, I found a way to recover my C++ experience and apply it to the jobs I'm working on, improving the performance of my projects.
Let's see how to create a Visual Studio C++ CMake project to develop a Wasm module, how to build the module and compile it with Emscripten. As a final and useful example, we will learn how to consume a Wasm module in a Webpack project and how Webpack reloads the webpage on the fly after any Wasm building.
Requirements
- Install Visual Studio Community (I'm using 2022 version but it should work with earlier versions), the only requirement is having installed
C++ CMake tools, andC++ Clang tools.
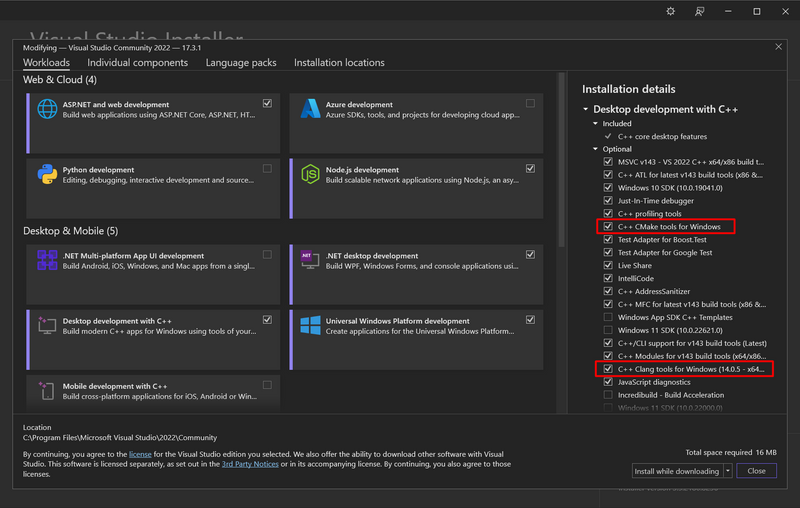
Install Node.js.
Install Emscripten SDK (emsdk). Follow instructions carefully, check Platform specific-notes to install it correctly in Windows.
Install MinGW (More info). This is the compiler Emscripten uses in Windows system. Basic package should be enough.
Emscripten toolchaincall someMinGWfiles to build and compile the Wasm module. CheckPath.To\emsdk\upstream\emscripten\cmake\Modules\Platform\Emscripten.cmakefor more info.
Creating a CMake Visual Sudio project to build Wasm module
Once everything is installed it is time to start building our project. In this section we are going to see how to create a CMake Visual Studio project to compile and generate the Wasm module.
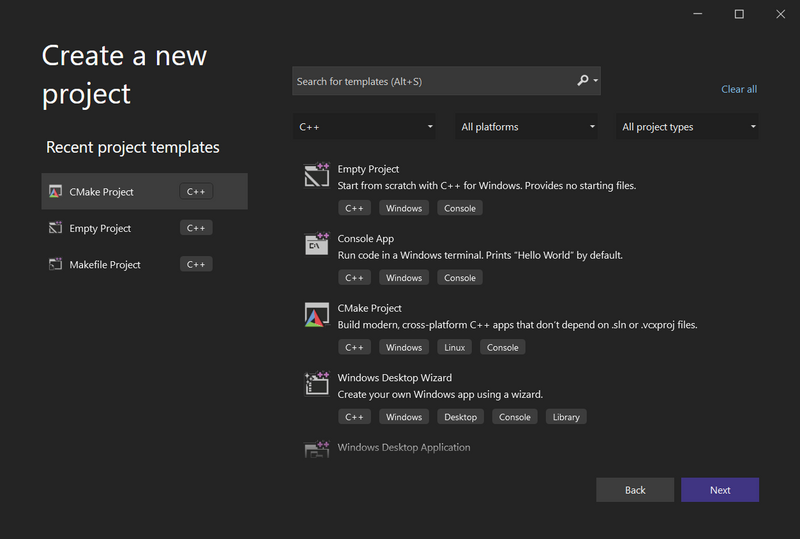
The first thing we need to do is creating a CMake project in Visual Studio. To do so open Visual Studio and select CMake project on Create a new project screen.
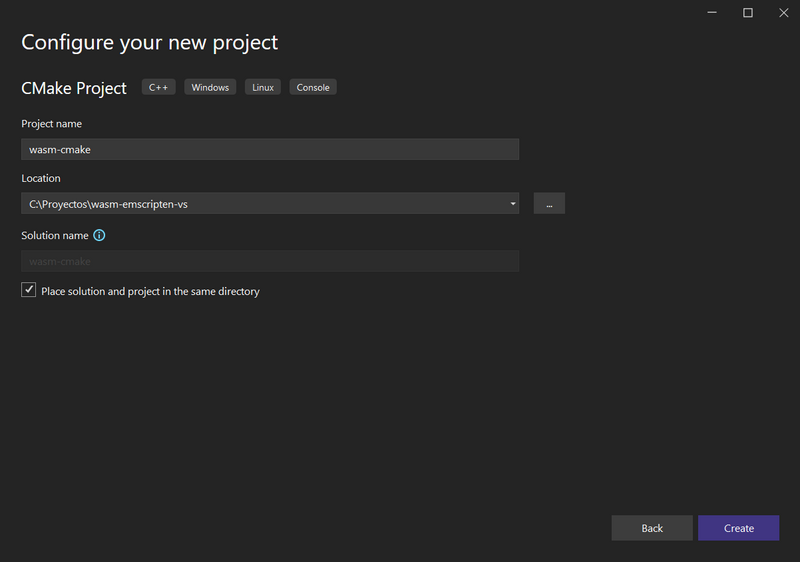
Check Place solution and project in the same directory, for the current post we are only creating a single CMake project.
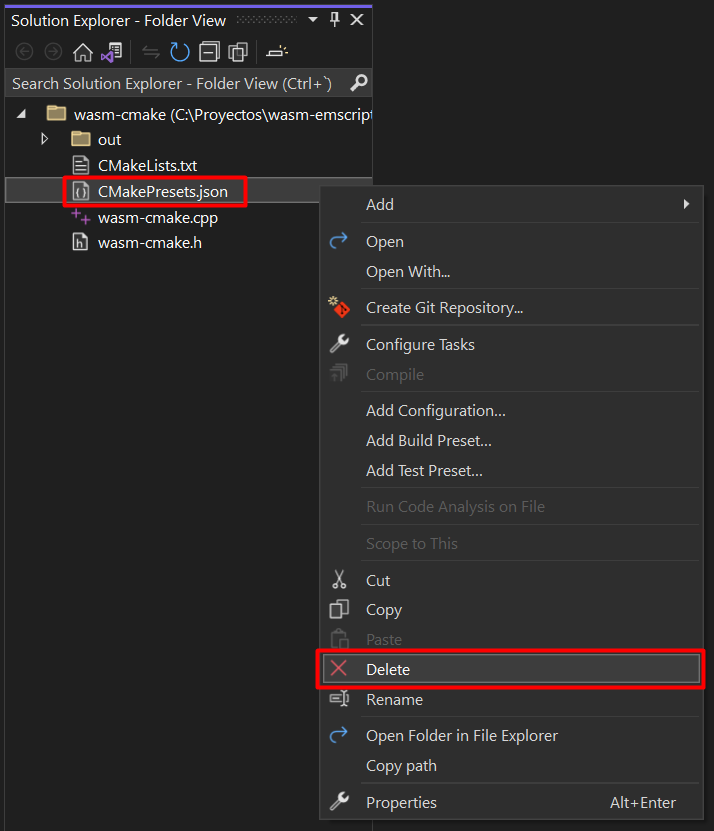
Once the solution is created, it is time to create the project presets (debug and release).
First of all delete the file CMakePresets.json. This file isn't needed for our purpose since Emscripten toolchain file defines part of these stuff.
CMakeLists.txt defines the CMake configuration to build the module. Depending on the target of our module we will add different information to this file, as well as to CMake variables that we will see later. This is how CMakeLists.txt should look like at this point:
CMakeLists.txt
# CMakeList.txt : CMake project for wasm-cmake, include source and define
# project specific logic here.
#
cmake_minimum_required (VERSION 3.8)

project ("wasm-cmake")

# Add source to this project's executable.
add_executable (wasm-cmake "wasm-cmake.cpp" "wasm-cmake.h")

if (CMAKE_VERSION VERSION_GREATER 3.12)
  set_property(TARGET wasm-cmake PROPERTY CXX_STANDARD 20)
endif()

# TODO: Add tests and install targets if needed.
Now open Manage Configurations... screen to generate the CMakeSettings.json file (the new presets file).

This screen is basically an UI view of CMakeSettings.json which contain the presets configurations, but here we can setup the CMake variables of our project as well. Press Edit JSON to see the JSON in text mode, and remember to close the JSON text file before opening the UI screen again through Manage Configurations....
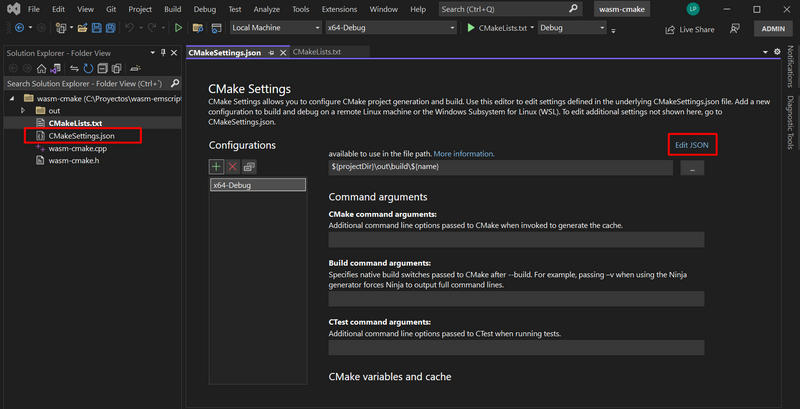
Edit the JSON file in the text editor (click Edit JSON) and remove the inheritEnvironments line or just leave it blank, that's not needed for our purpose. Save and close the file.
CMakeSettings.json
{
  "configurations": [
    {
      "name": "x64-Debug",
      "generator": "Ninja",
      "configurationType": "Debug",
      "buildRoot": "${projectDir}\\out\\build\\${name}",
      "installRoot": "${projectDir}\\out\\install\\${name}",
      "cmakeCommandArgs": "",
      "buildCommandArgs": "",
      "ctestCommandArgs": ""
    }
  ]
}
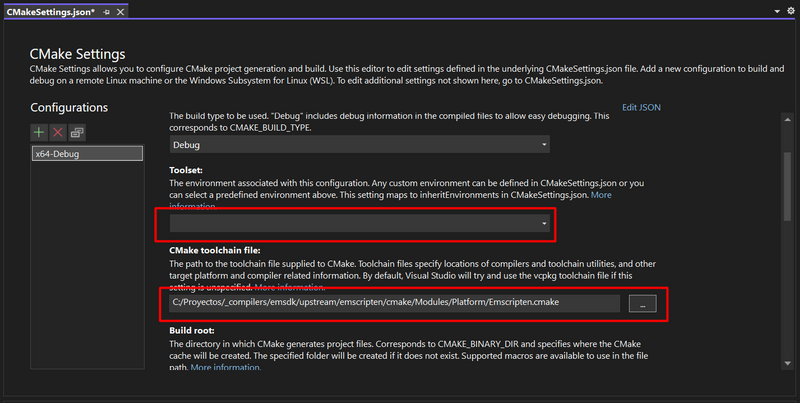
Open again Manage Configurations... to see the CMake Settings UI view. Add Emscripten CMake toolchain located on folder Path.To\emsdk\upstream\emscripten\cmake\Modules\Platform\Emscripten.cmake to the CMake toolchain file field and save.
Also, and very important, is to setup the IntelliSense mode, otherwise our code will be full of errors and we won't be able to
build the module. To do so open CMake Settings UI view, scroll down, click on Show advanced settings and set windows-clang-x64 as the IntelliSense mode.
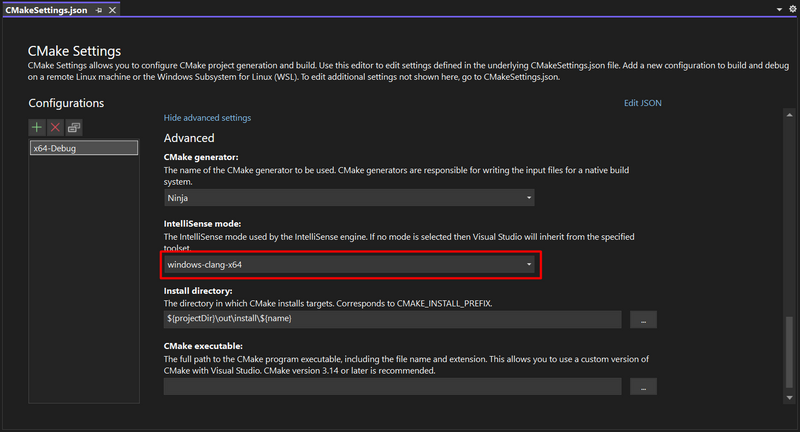
NOTE: At the moment I didn't find a Visual Studio Clang mode that fully fulfit Emscripten library code; will be some errors inside Emscripten library but that won't affect to our code. We will be able to build our project without any error.
A last step we can do here is to add the Release preset (since Debug preset is created by default). To do so, Edit the JSON in text mode, duplicate the Debug preset and replace Debug by Release on the required fields.
At this point the CMakeSettings.json file should look like this:
CMakeSettings.json
{
  "configurations": [
    {
      "name": "x64-Debug",
      "generator": "Ninja",
      "configurationType": "Debug",
      "buildRoot": "${projectDir}\\out\\build\\${name}",
      "installRoot": "${projectDir}\\out\\install\\${name}",
      "cmakeCommandArgs": "",
      "buildCommandArgs": "",
      "ctestCommandArgs": "",
      "cmakeToolchain": "C:/Proyectos/_compilers/emsdk/upstream/emscripten/cmake/Modules/Platform/Emscripten.cmake",
      "inheritEnvironments": [],
      "intelliSenseMode": "windows-clang-x64"
    },
    {
      "name": "x64-Release",
      "generator": "Ninja",
      "configurationType": "Release",
      "buildRoot": "${projectDir}\\out\\build\\${name}",
      "installRoot": "${projectDir}\\out\\install\\${name}",
      "cmakeCommandArgs": "",
      "buildCommandArgs": "",
      "ctestCommandArgs": "",
      "cmakeToolchain": "C:/Proyectos/_compilers/emsdk/upstream/emscripten/cmake/Modules/Platform/Emscripten.cmake",
      "inheritEnvironments": [],
      "intelliSenseMode": "windows-clang-x64"
    }
  ]
}
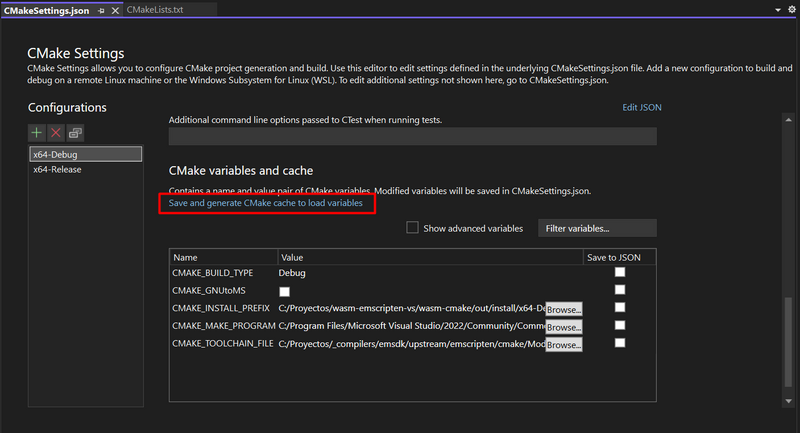
Click Save and generate CMake cache to load variables.
Congratulations! The presets of our project are ready now!
Something important to know about the build are the CMake variables. These variables are located in the CMake Settings UI View: Cmake variables and cache table. Open it, click on Show advanced variables and check how Emscripten has MinGW as compiler.
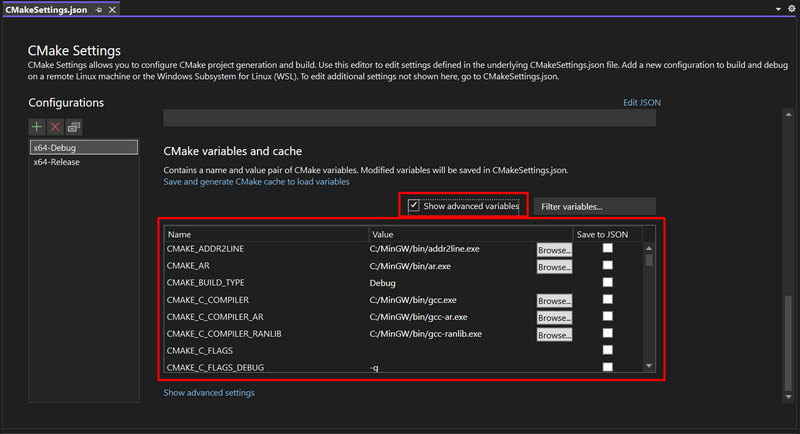
It is possible to configure Emscripten compiler options through the CMake variables. For example we can set the optimization flags in the CMAKE_CXX_FLAGS variable.
Before start working on our code, we need to add Emscripten include folder to CMake includes directory. Emscripten brings an interface that let a Wasm module to communicate and interact with Browser (or Node) and vice versa. In other words, it appends a series of functions and functionalities to the Wasm module to let the Browser communicate and interact with it trough the preamble.js file (See more).
Add the include directory:
CMakeLists.txt
# CMakeList.txt : CMake project for wasm-cmake, include source and define
# project specific logic here.
#
cmake_minimum_required (VERSION 3.8)

project ("wasm-cmake")

# Add source to this project's executable.
add_executable (wasm-cmake "wasm-cmake.cpp" "wasm-cmake.h")

# Add emscripten include directory ⬇️
target_include_directories(wasm-cmake PUBLIC "Path.To/emsdk/upstream/emscripten/cache/sysroot/include")

if (CMAKE_VERSION VERSION_GREATER 3.12)
  set_property(TARGET wasm-cmake PROPERTY CXX_STANDARD 20)
endif()

# TODO: Add tests and install targets if needed.
Remember that after any CMake configuration modification Delete Cache and Reconfigure needs to be executed to be sure the CMake cache is ready.

Building Wasm module
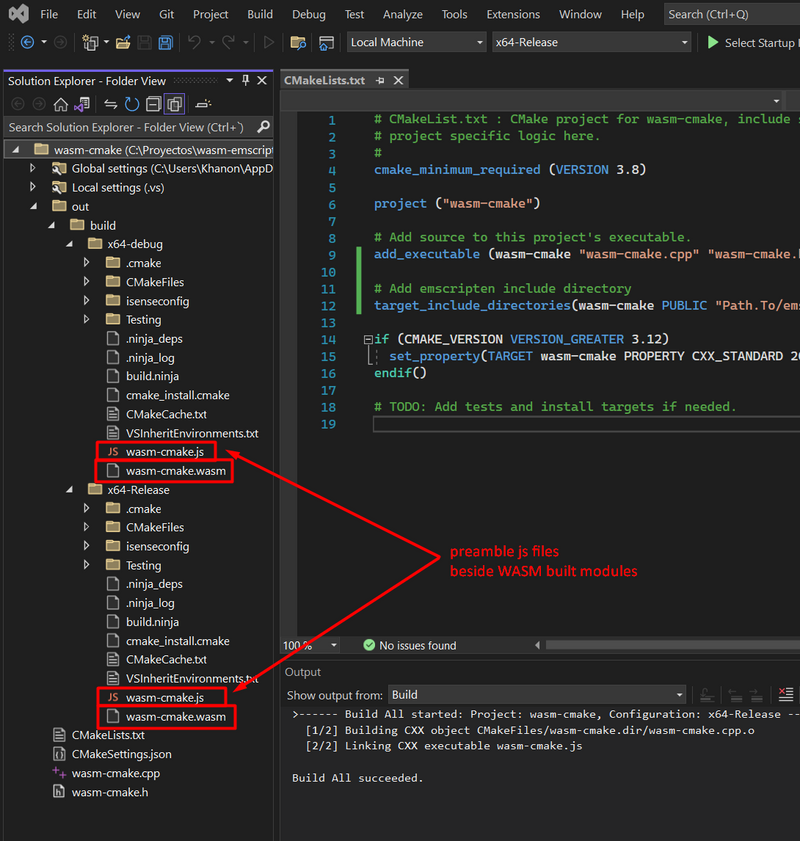
From this point we can start programming our C++ code and building the Wasm module. Build All the solution and check the output folders. Wasm modules are located in each preset folder besides the .js preamble files. Wasm module will be loaded from this preamble .js file.
NOTE: Click Show All Files to see the content of out folder.
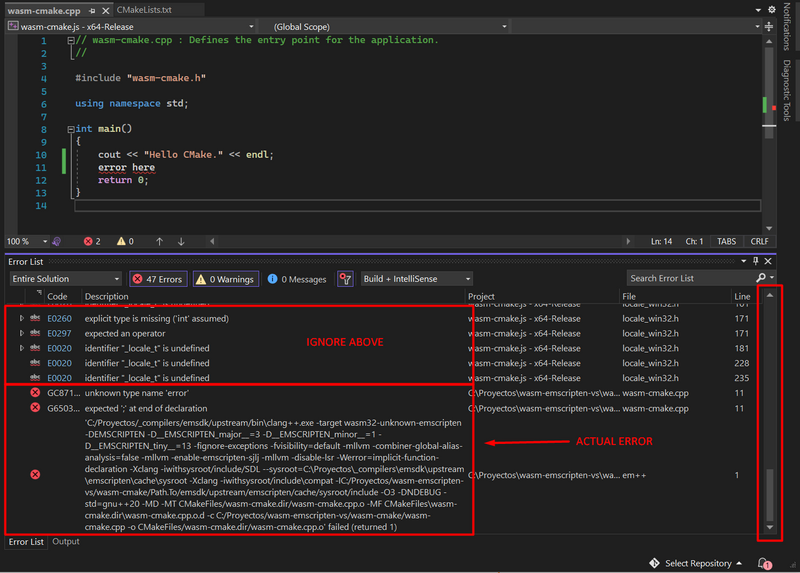
Compilation errors
If your code has compilation errors, you'll probably see a lot of nonsense errors on console. This is because Clang IntelliSense doesn't fully fulfit Emscripten library version. To check the actual error on your code, scroll down to the last errors and ignore Emscripten library errors avobe.
Testing Wasm Module from Visual Studio (Emscripten Test Page)
Okey, it is time to go further. Emscripten has a nice feature that lets to test the Wasm Module in an auto-built HTML page. In that way it is possible to test most of features from the Emscripten API and for example run a whole video game in the test page.
It is not possible to interact with Wasm Module from browser since we don't have control on the HTML itself, but believe me if I say that from Wasm Module we can do many many things using Emscripten HTML5 library.
For our example we'll use a test file located on Emsicrpten github.
Check the GitHub of the Visual Studio Emscripten HTML5 test project.
Okey, lets start!
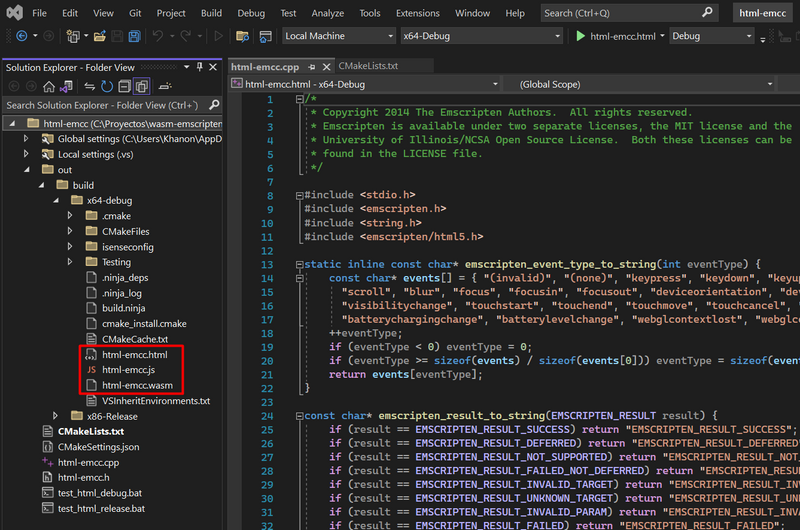
You can create a new CMake project or use the previous one we've been working on, anyway I assume you'll continue from the last step before this section. In my case I created a new project and named it html-emcc.
First thing is telling Emscripten to build the HTML Test Page. Go to CMakeLists.txt and set CMAKE_EXECUTABLE_SUFFIX variable to .html:
CMakeLists.txt
# CMakeList.txt : CMake project for html-emcc, include source and define
# project specific logic here.
#
cmake_minimum_required (VERSION 3.8)

project ("html-emcc")

# Add source to this project's executable.
add_executable (html-emcc "html-emcc.cpp" "html-emcc.h")

# Add emscripten include directory
target_include_directories(html-emcc PUBLIC "C:/Proyectos/_compilers/emsdk/upstream/emscripten/cache/sysroot/include")

## Add Emscripten HTML Test Page ⬇️
set(CMAKE_EXECUTABLE_SUFFIX .html)

if (CMAKE_VERSION VERSION_GREATER 3.12)
  set_property(TARGET html-emcc PROPERTY CXX_STANDARD 20)
endif()

# TODO: Add tests and install targets if needed.
Now copy the whole test file content into html-emcc.cpp.
You will see no errors on IDE thanks to Clang intellisense.
Clean and build. A new HTML file should be found besides the Wasm module and the preamble js.
To run the browser and serve the Wasm Module to the webpage we need to do a couple of tricks.
First, install statikk npm package globally (follow instructions).
npm install -g statikk
It is a very simple static server that allows opening the browser and reading files from its root.
Second, we need to run the webpage from Visual Studio. To do so we can use two batch files for each debug and release.
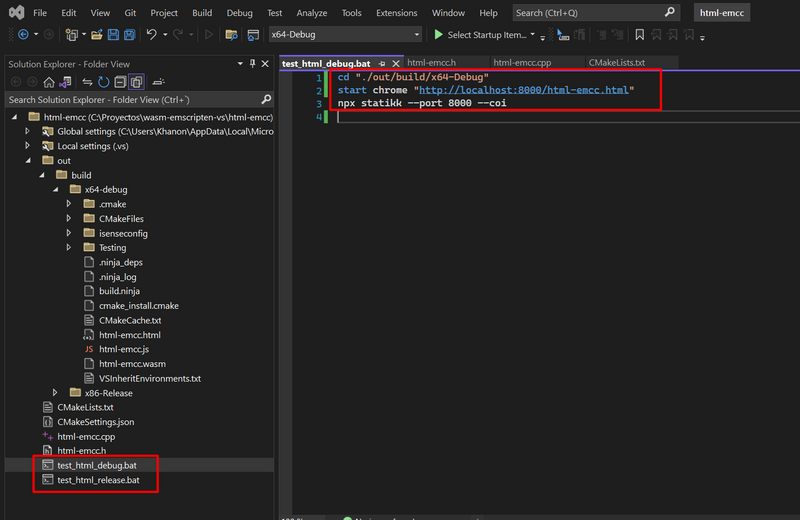
Create test_html_debug.bat and test_html_release.bat in root folder and add this content (do this for both debug and release):
test_html_debug.bat
cd "./out/build/x64-Debug"
start chrome "http://localhost:8000/html-emcc.html"
npx statikk --port 8000 --coi
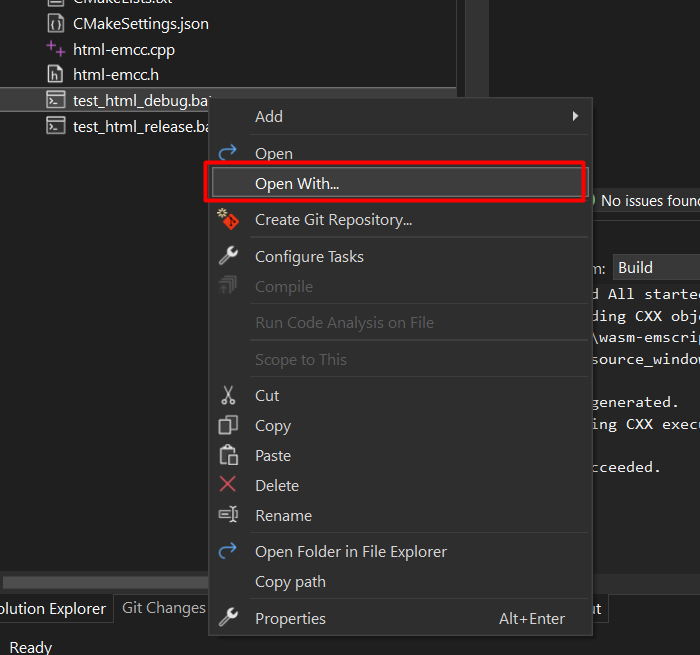
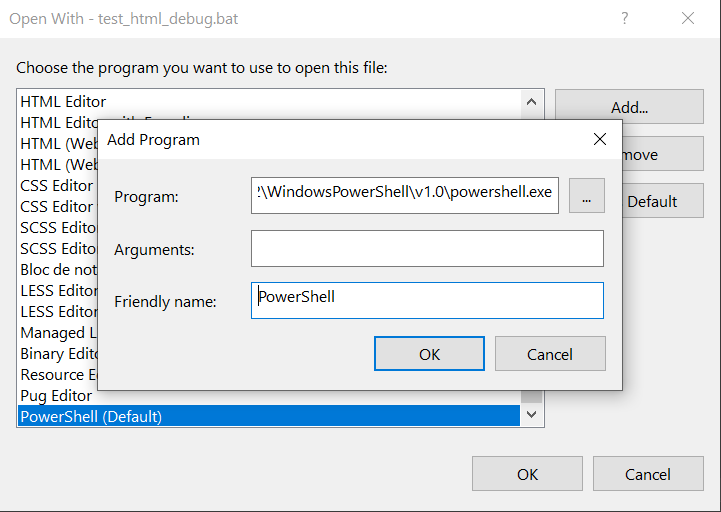
To be able to run the batch file doing double-click follow next instructions: press right-click over it, Open with... press Add... and add Powershell path. Then set as default.
Any time double-clicking on the batch file, it will open a powershell window and run the HTML test page in a browser. Thanks to the static server, the page will be able to load the Wasm Module located in its root.

Tip: From this point you don't need to close the browser to reload a new build of Wasm Module. Just build and refresh the browser to reload it.
Finally this is how we can fully develop a Wasm Module and test it in Visual Studio! I hope you enjoyed it as much as I did!
The guide doesn't end here... time to go pro? Check the next post.
Consume the Wasm Module from Webpack Project

NOTE: I wanted to write another post showing how to develop a Wasm Module besides a Visual Studio Node.js project.
Sadly, at the moment Visual Studio doesn't allow to have a CMake project within a Solution and take part of it besides a Node.js project, allowing to build/run them in a single step. I decided to postpone Node.js post for a future if VS allows CMake to be within a Solution.
We'll be using Visual Studio Code for the webpack project, and Visual Studio 2022 to program and build the Wasm Module.


Top comments (4)
i'm stuck at this error. any ideas? i've tried settings this in various places and ways
error : CMakeFiles/wasm-cmake.dir/wasm-cmake.cpp.o: must specify -mwasm64 to process wasm64 object files
no luck with any of these
set(CMAKE_C_FLAGS "${CMAKE_C_FLAGS} MEMORY64=1")
set(CMAKE_CXX_FLAGS_DEBUG "MEMORY64=1")
set(CMAKE_EXE_LINKER_FLAGS "MEMORY64=1 ${CMAKE_EXE_LINKER_FLAGS}")
set(CMAKE_SYSTEM_PROCESSOR 64)
set(CMAKE_C_FLAGS "MEMORY64")
set(CMAKE_CXX_FLAGS "MEMORY64")
set(CMAKE_CXX_FLAGS_DEBUG "MEMORY64")
set($ENV{CFLAGS} "MEMORY64")
set(CMAKE_LIBRARY_ARCHITECTURE "wasm64-emscripten")
set(CMAKE_CXX_FLAGS "-mwasm64")
set(EMSCRIPTEN_SYSTEM_PROCESSOR "64")
set(EMSCRIPTEN_SYSTEM_PROCESSOR "x86_64")
add_link_options("LINKER:-mwasm64")
target_link_options(wasm-cmake INTERFACE "SHELL:-s MEMORY64=1" -mwasm64)
Im also getting this error, no solutions yet.
Sorry, @swinefeaster and @alexwennstrom . For some reason the site didn't notify me about your question. Are you still having issues?
After "Save and Generate CMake cache" step, the variables are not updated as expected. How do I fix this?