If you haven't done yet, please check how to build a Wasm module in Visual Studio before reading this post:

Following the previous guide, in this post we will see how to develop a Webpack project and how to consume the Visual Studio C++ Wasm Module in it with practical examples and integration between Wasm and Javascript.
Check the GitHub of both projects:
Both projects are in separated folders since each one is developed in a different IDE.
Visual Studio 2022 doesn't let at the moment to have the CMake project within a Solution, and it neither has support for Webpack, so we will use Visual Studio 2022 for the Wasm Module, and Visual Studio Code for the Webpack project. CMake will automatize copying the Wasm module to the Webpack project. Webpack reloads on the fly after any new Wasm module build, not needing to restart it. That helps on testing stuff.
Creating the Webpack project
I'll assume you have basic knowledges of NPM, Typescript and Webpack. As commented previously, we'll develop the Webpack project in Visual Studio Code, but you can use any IDE of your preference.
Let's start.
First of all create a blank npm project in the Webpack project's folder. Remember both Webpack and Cmake project will be placed in different folders on the same root. My project is named webpack-project.
npm init
package.json
{
  "name": "webpack-project",
  "version": "1.0.0",
  "description": "",
  "main": "index.js",
  "scripts": {
    "test": "echo \"Error: no test specified\" && exit 1"
  },
  "author": "",
  "license": "ISC"
}
Public folder
The next step is creating the HTML and CSS styles. Just copy the ones from github to public folder.
Relevant elements are (by id):
- current-time-value: This timer will be updated from Wasm Module in a main loop.
- input-box: Text that will be sent to Wasm Module, and then back to Javascript with an array of numerical ASCII codes.
- input-button: Button tha triggers calling to Wasm function with input-box text.
- wasm-result: Result from Wasm Module containing the array of numerical ASCII codes.
index.html
<!doctype html>
<html>
    <head>
        <meta charset="UTF-8"/>
        <title>Webpack / Wasm - Test</title>
        <link rel="stylesheet" href="app.css"/>
    </head>
    <body>
        <div id="container">
            <div id="current-time-title">Current time (from Wasm!)</div>
            <div id="current-time-value">00:00:00.000</div>
            <div id="input-title">Insert a text, Wasm will return the ASCII code of each character.</div>
            <input id="input-box"></input>
            <button id="input-button">Test Wasm!</button>
            <div id="wasm-result"></div>
        </div>
    </body>
</html>
Installing dependencies
It is time now to install the dependencies we'll use in our project.
Typescript support, webpack, webpack cli, webpack-dev-server to run the web on a browser locally, copy-webpack-plugin plugin, html-webpack-plugin plugin and ts-loader for typescript compilation.
Since we don't know if packages might change in the future, I recommend using these versions:
npm i typescript@4.7.4 -D
npm i webpack@5.73.0 -D
npm i webpack-cli@4.10.0 -D
npm i webpack-dev-server@4.9.3 -D
npm i copy-webpack-plugin@11.0.0 -D
npm i html-webpack-plugin@5.5.0 -D
npm i ts-loader@9.3.1 -D
Configuring tsconfig
Now that we have all dependencies, we can start configuring tsconfig file. This is telling ts-loader how to compile the project. In our case the module resolution is set to node, Wasm Module needs it to run, and the target is es6 which supports imports and fits with the Wasm ES6 JavaScript module we'll built.
To generate the tsconfig file run:
tsc --init
Fill it as below:
tsconfig.json
{
  "compilerOptions": {
    "moduleResolution": "node",
        "module": "es6",
        "target": "es6",
        "lib": [
            "dom",
            "es6"
        ],
        "importHelpers": true,
        "declaration": false,
        "noResolve": false,
        "noImplicitThis": true,
        "noImplicitAny": false,
        "noImplicitReturns": false,
        "strictFunctionTypes": true,
        "skipLibCheck": true,
        "strict": true,
        "strictPropertyInitialization": false,
        "strictNullChecks": false,
        "experimentalDecorators": true,
        "sourceMap": true,
        "preserveConstEnums":true
  }
}
Configuring Webpack
Time to configure webpack for our project.
Create webpack.config.js file in root folder and add the code below:
webpack.config.js
const fs = require('fs');
const HtmlWebpackPlugin = require('html-webpack-plugin');
const CopyWebpackPlugin = require('copy-webpack-plugin');

const path = require('path');
const appDirectory = fs.realpathSync(process.cwd());

module.exports = {
    entry: path.resolve(appDirectory, 'src/app.ts'),
    output: {
        filename: 'app.js',
    },
    resolve: {
        extensions: ['.ts', '.js'],
    },
    devServer: {
        host: 'localhost',
        port: 8080,
        hot: true,
        open: true,
        static: {
            publicPath: '/',
        },
    },
    module: {
        rules: [
            {
                test: /\.tsx?$/,
                use: 'ts-loader',
                exclude: /node_modules/,
            },
        ],
    },
    plugins: [
        new HtmlWebpackPlugin({
            inject: true,
            template: path.resolve(appDirectory, 'public/index.html'),
            favicon: null
        }),
        new CopyWebpackPlugin({
            patterns: [
              { from: "public/app.css", to: "." }
            ],
        }),
    ],
    mode: 'development',
};
What webpack does here (apart of building the project to dist folder) is basically mounting a server, opening index.html in the browser and running the compiled file app.js. The entry property is set to app.ts, the main file of our project. ts-loader compiles app.ts and generates the output app.js. index.html placed in public folder is served by the server (check how HtmlWebpackPlugin works) it also adds app.js script to the html, and CopyWebpackPlugin does the job of copying the css file to dist folder after the build.
For the devServer configuration we have the host to localhost, port to 8080, open to true to automatically open the browser on webpack run, and hot to true, which enables webpack to auto-reload the page on any source modification. In this way, any time the Wasm Module is built, the browser will reload.
Finally, add start and build scripts to package.json. Besides this and since app.ts is the entry point of our application, set main property to app.ts. This doesn't make any change, but it is good to have the code as clear as possible.
package.json
{
  "name": "webpack-project",
  "version": "1.0.0",
  "description": "",
  "main": "app.ts",
  "scripts": {
    "test": "echo \"Error: no test specified\" && exit 1",
    "build": "rimraf ./dist && webpack --config webpack.config.js",
    "start": "webpack serve --port 8080 --config webpack.config.js"
  },
  "author": "",
  "license": "ISC",
  "devDependencies": {
    "copy-webpack-plugin": "^11.0.0",
    "html-webpack-plugin": "^5.5.0",
    "ts-loader": "^9.3.1",
    "typescript": "^4.7.4",
    "webpack": "^5.73.0",
    "webpack-cli": "^4.10.0",
    "webpack-dev-server": "^4.9.3"
  }
}
Source folder
The last step is adding the src folder, which contains app.ts and where Visual Studio will place the Wasm Module after build it.
Add this code to app.ts:
app.ts
console.log("Hello emscripten from Javascript")
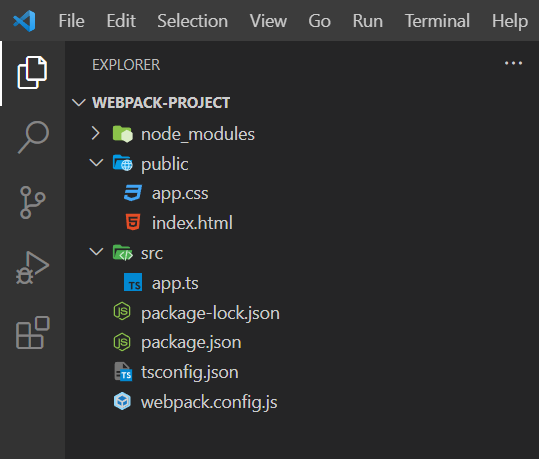
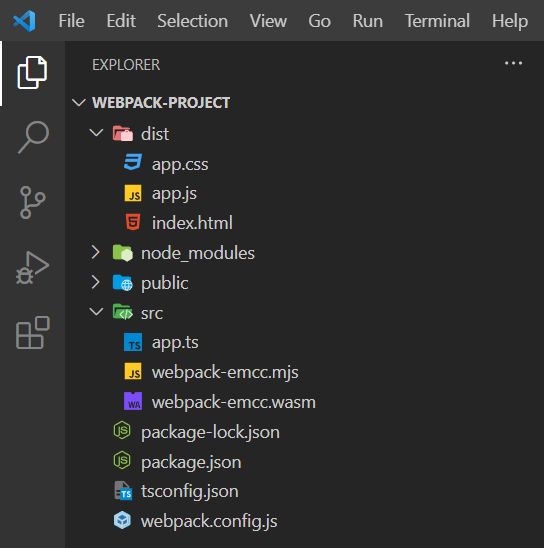
This is how the project looks like at this point:
Running scripts
Run the scripts and check everything is working.
start script should open index.html in a browser.
npm run start
build script should build the project in dist folder.
npm run build
Creating CMake project for the Wasm Module
It is time to create the CMake project to program and build the Wasm Module. To do so follow the previous post of the guide.
I assume you are already building the Wasm Module in out folder like we did in the previous post. In my case I named the project webpack-emcc.
Generating ES6 preamble file
As mentioned previously, the Webpack project's tsconfig target is set es6. The reason is that we want to use a .mjs Wasm ES6 JavaScript module. That save us a lot of work to give support to .js Wasm module, which would drive us to have to polyfill many missing functions from Webpack. To generate the Wasm ES6 JavaScript module we simply have to set CMAKE_EXECUTABLE_SUFFIX to .mjs in CMakeList.txt.
CMakeLists.txt
# CMakeList.txt : CMake project for webpack-emcc, include source and define
# project specific logic here.
#
cmake_minimum_required (VERSION 3.8)

project ("webpack-emcc")

# Add source to this project's executable.
add_executable (webpack-emcc "webpack-emcc.cpp" "webpack-emcc.h")

# Add emscripten include directory
target_include_directories(webpack-emcc PUBLIC "C:/Proyectos/_compilers/emsdk/upstream/emscripten/cache/sysroot/include")

# Generate a ES6 Javascript preamble ⬇️
set(CMAKE_EXECUTABLE_SUFFIX .mjs)

if (CMAKE_VERSION VERSION_GREATER 3.12)
  set_property(TARGET webpack-emcc PROPERTY CXX_STANDARD 20)
endif()

# TODO: Add tests and install targets if needed.
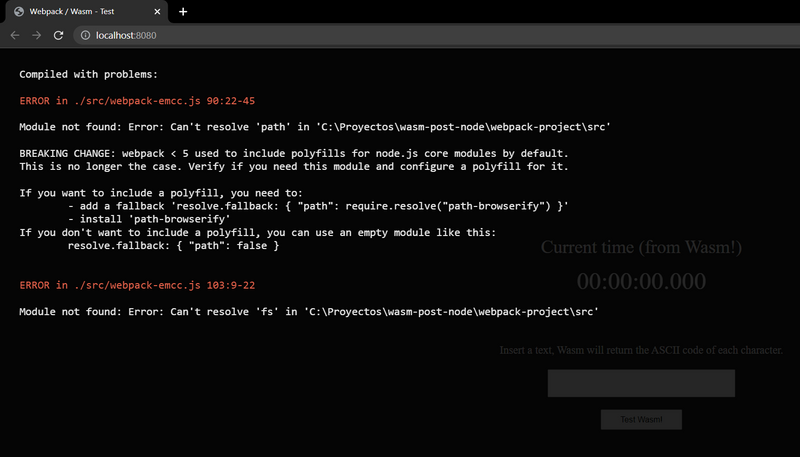
These are the kind of errors thrown by Webpack if we don't use a ES6 Wasm module:
Copying Wasm Module to Webpack project
The last thing we have to do in CMakeLists.txt is to copy the .wasm module and .mjs preamble file to the Webpack project src folder automatically after build. To do this we need to create two variables for source and target paths and execute a couple of commands in cmake post-build step. The source path depends on Visual Studio selected preset debug or release as you can see in the scripts.
CMakeLists.txt
# CMakeList.txt : CMake project for webpack-emcc, include source and define
# project specific logic here.
#
cmake_minimum_required (VERSION 3.8)

project ("webpack-emcc")

# Add source to this project's executable.
add_executable (webpack-emcc "webpack-emcc.cpp" "webpack-emcc.h")

# Add emscripten include directory
target_include_directories(webpack-emcc PUBLIC "C:/Proyectos/_compilers/emsdk/upstream/emscripten/cache/sysroot/include")

set(CMAKE_EXECUTABLE_SUFFIX .mjs)

if (CMAKE_VERSION VERSION_GREATER 3.12)
  set_property(TARGET webpack-emcc PROPERTY CXX_STANDARD 20)
endif()

# Add post-build command to copy WASM to Webpack project ⬇️
if (CMAKE_BUILD_TYPE MATCHES "Debug")
    set(SOURCE_FOLDER ${PROJECT_SOURCE_DIR}/out/build/x64-debug)
else()
    set(SOURCE_FOLDER ${PROJECT_SOURCE_DIR}/out/build/x64-release)
endif()

set(TARGET_WEBPACK_JS "${PROJECT_SOURCE_DIR}/../webpack-project/src")

message("Copying WASM file from " ${SOURCE_WASM} " to " ${TARGET_WEBPACK_WASM})

add_custom_command(TARGET webpack-emcc POST_BUILD
   COMMAND ${CMAKE_COMMAND} -E copy ${SOURCE_FOLDER}/webpack-emcc.wasm ${TARGET_WEBPACK_JS}
   COMMAND ${CMAKE_COMMAND} -E copy ${SOURCE_FOLDER}/webpack-emcc.mjs ${TARGET_WEBPACK_JS}
)
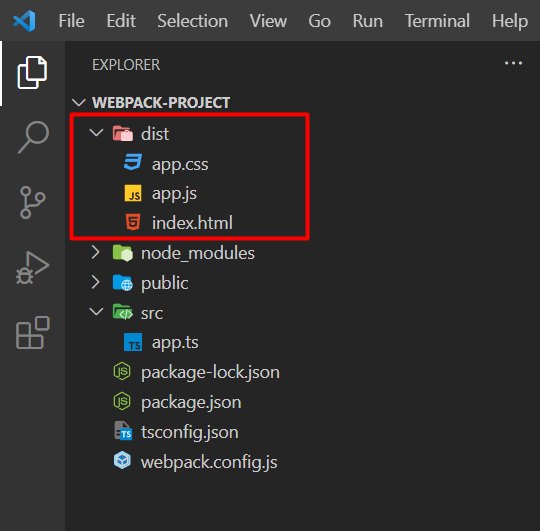
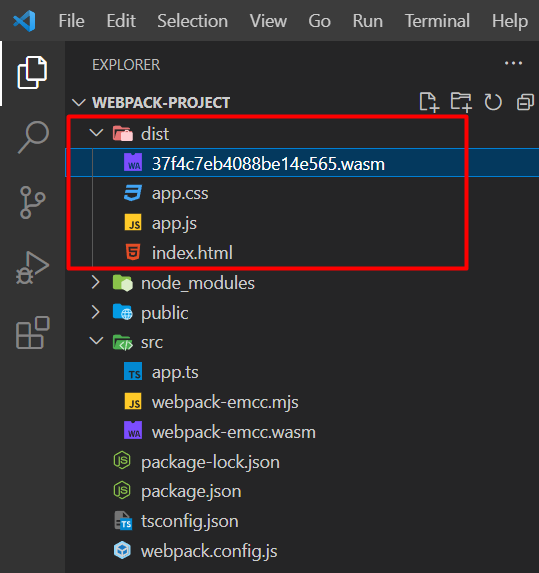
After building the Wasm module, both .wasm and .mjs files should be placed in src folder of Webpack project:
Integration between Wasm and Webpack
Now that we have the Wasm module available in Webpack project, it is time to start with the integration, or in another words how will they both communicate between them to share data.
But before that, lets do a quick test to check everything is working fine.
Creating the Wasm Module in the Webpack project
Place this code in Visual Studio webpack-emcc.cpp:
webpack-emcc.cpp
// webpack-emcc.cpp : Defines the entry point for the application.
//

#include "webpack-emcc.h"

using namespace std;

int main()
{
    printf("Hello emscripten from C++\n");
    return 0;
}
and this code to Webpack project app.ts:
app.ts
// Import WASM Module from preamble file
import Module from './webpack-emcc.mjs';

console.log("Hello emscripten from Javascript")

/**
 * Wasm module interface.
 * Only functions exported on emcc compilation are added to the module.
 * See -sEXPORTED_RUNTIME_METHODS flag on CMAKE_CXX_FLAGS variables.
 */
interface WasmModule {
}
let wasmModule: WasmModule

/**
 * Create Wasm module (returns a Promise), then start the app
 */
Module().then((module: WasmModule) => {
    // Wasm module object
    wasmModule = module
    console.log("Wasm module:", module)
}).catch(error => {
    console.log("Error creating Wasm module:", error)
})
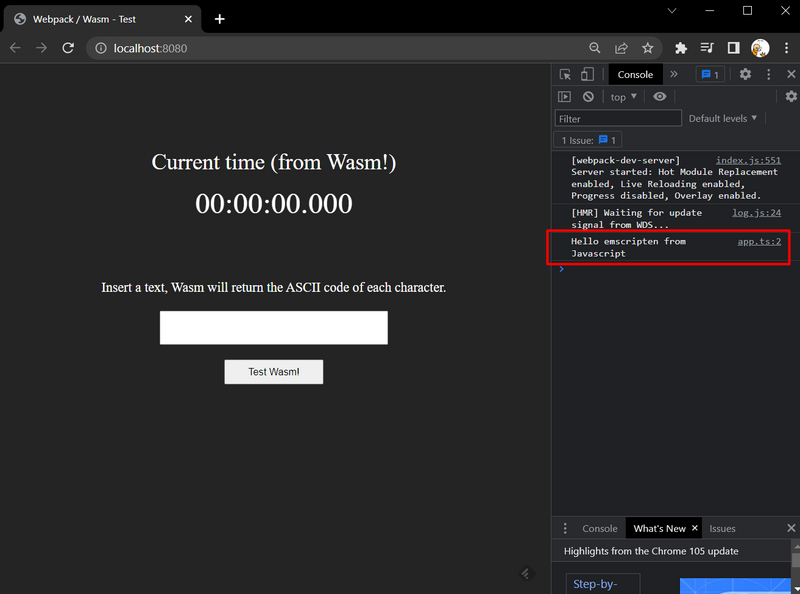
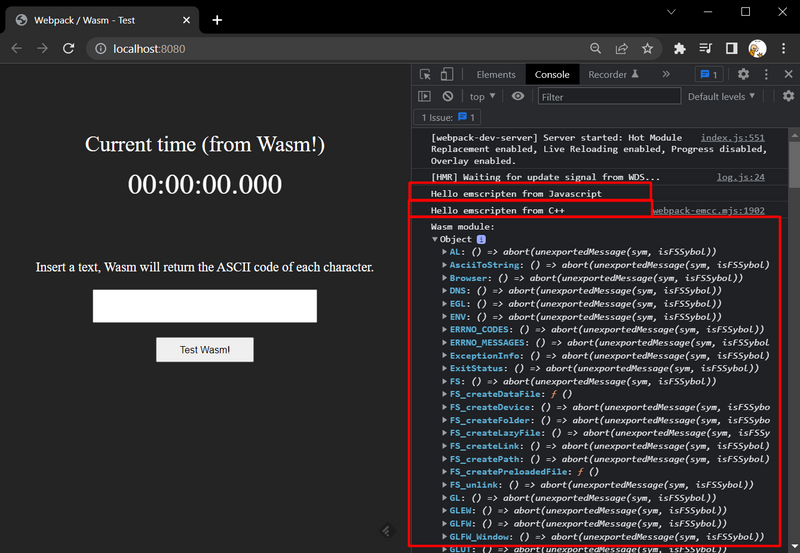
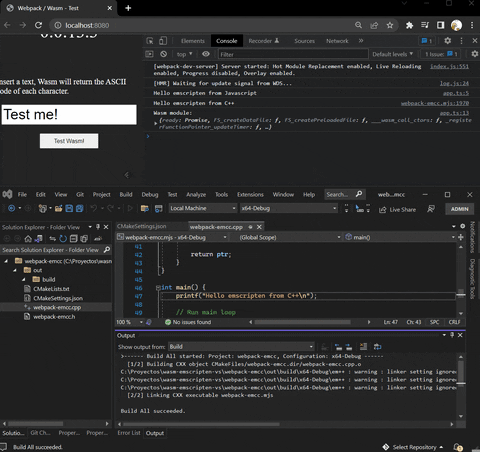
Build the Wasm module and run the Webpack project with npm run start. The browser opens and you should see Hello logs from C++ and Javascript, and a log of what the Wasm object contains.
If that's working you are in the right way 😌
What are we doing here? Regarding app.ts firstly we import the Wasm Module, then we create an interface that will contain every runtime method exported from Wasm module (we will add them later), and finally we create the module calling preamble Module() promise.
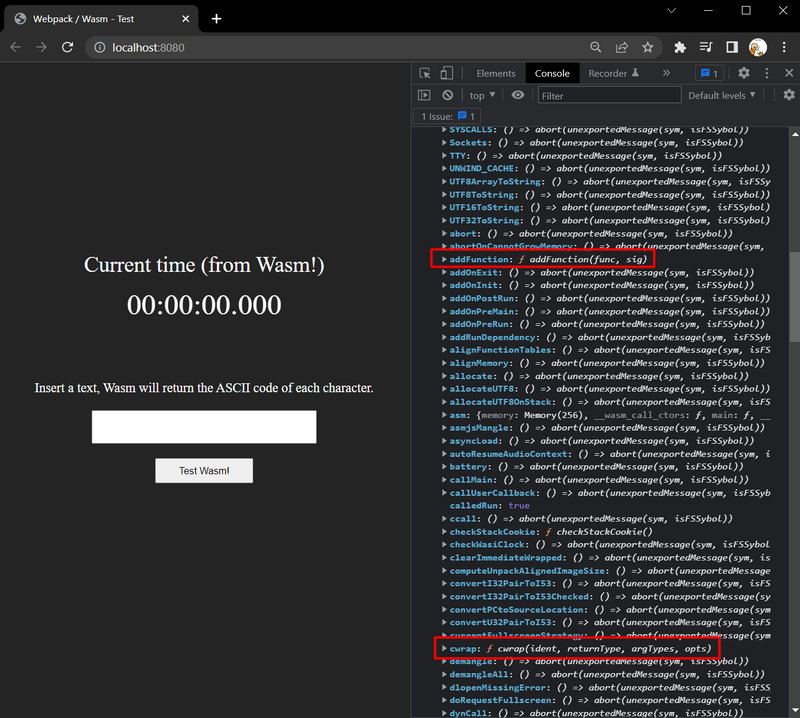
Emscripten runtime methods and flags
Next step is exporting runtime methods from Wasm. Runtime methods are those created by emscripten to allow doing different jobs or interactions between Javascript and wasm, like calling a C++ function, accesing memory, etc. By default, the preamble.js file doesn't export any runtime method. That's done to save space and memory, so we have to explicityly indicate which methods we are going to use in our Wasm module adding them to sEXPORTED_RUNTIME_METHODS flag. Those methods will be present in webpack-emcc.mjs preamble file.
For our module we will use: addFunction, cwrap and getValue
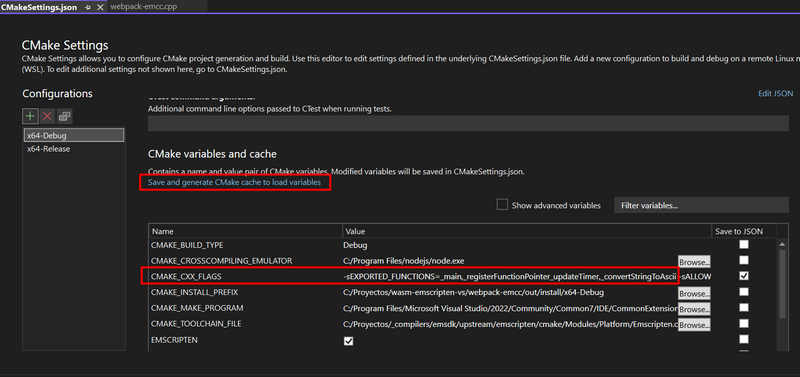
See that for addFunction it is neccesary to add the flag sALLOW_TABLE_GROWTH to allow dynamic functions table.
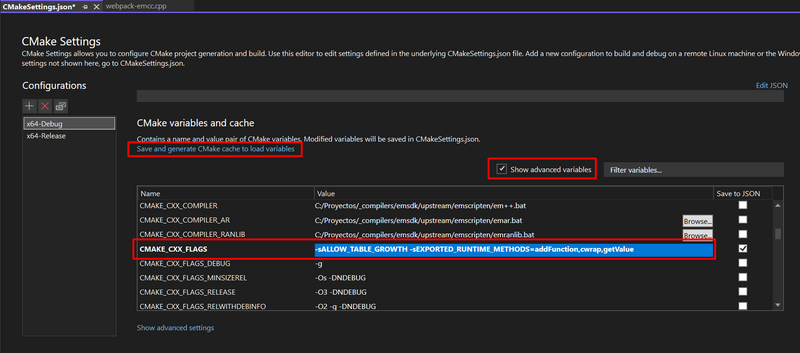
Open CMakeSettings.json UI editor, click on Show advanced variables and add those flags to CMAKE_CXX_FLAGS. Then press Save and generate CMake cache to load variables.
-sALLOW_TABLE_GROWTH -sEXPORTED_RUNTIME_METHODS=addFunction,cwrap,getValue
Now, those three methods are available in webpack-emcc.mjs. To do our journey easier, lets add them to app.ts WasmModule interface:
app.ts
interface WasmModule {
    addFunction: (func: Function, signature: string) => string
    cwrap: <T>(ident: string, returnType: string, argumentTypes: string[]) => T
    getValue: (ptr: number, type: string) => number
}
I figured out what types are the arguments and returns testing a bit the preamble file and reading the documentation of each method.
Executing the Webpack project and checking the log of Wasm object, we can see those three methods available (and others of internal use of Emscripten):
Exporting C++ functions
Now we have all what we need from Emscripten and both projects are integrated, it is time to create the logic of our functions.
What we are going to do is:
- Update a timer from Wasm and display it in the HTML.
- Insert a text in the HTML input, click a button, send it to Wasm, convert it and send back ASCII codes to Javascript, then display it in the HTML.
For the timer we are creating an infinite loop in C++. Emscripten has a method for that. Frame by frame update a timer in C++ and send it to Javascript. Javascript will update it in the HTML.
As for the text converted to ASCII codes, we are creating a function in C++ that will receive and process the text, and then we will return it in an unsigned int buffer. The size of this buffer is equivalent to the text length.
Let's begin by the Wasm module in C++ (remove all the content in webpack-emcc.cpp).
First add the include files and variables. updateTimer variable will be the pointer to the Javascript function of the same name, later we'll see how to assign it. startimer is the first timer value. We get the value from emscripten method emscripten_get_now.
webpack-emcc.cpp
// webpack-emcc.cpp : Defines the entry point for the application.

#include <stdio.h>
#include <stdlib.h>
#include <string>
#include <emscripten/html5.h>

void (*updateTimer)(int) = 0;
int startTimer = emscripten_get_now();
Add now the loop function. It basically calls the Javacript updateTimer function and send the current timer value.
webpack-emcc.cpp
EM_BOOL loop(double time, void* userData)
{
    if (updateTimer)
    {
        updateTimer(emscripten_get_now() - startTimer);
    }
    else
    {
        printf("No registered function\n");
    }

    return EM_TRUE;
}
Next point is to create the functions we will export from C++ Wasm to Javascript. They will be called from Javascript. Exported functions are defined inside the extern "C" block to say compiler not to mangle the names.
registerFunctionPointer_updateTimer is called from javascript to register updateTimer function in C++. In that way we have access to the javascript function from C++. It is a bit tricky how we have to assign the pointer, but that's how it works. See that void is the return type and (*)(int) is the pointer to a function with one int argument.
convertStringToAscii is called from javascript with the text to convert and returns an unsigned int buffer with ASCII codes.
webpack-emcc.cpp
extern "C"
{
    void registerFunctionPointer_updateTimer(char* id)
    {
        updateTimer = reinterpret_cast<void (*)(int)>(atoi(id));
    }

    unsigned int const* convertStringToAscii(char* text)
    {
        std::string str(text);
        unsigned int* ptr = (unsigned int*)malloc(str.size());

        for (int i = 0; i < str.size(); i++)
        {
            ptr[i] = int(text[i]);
        }

        return ptr;
    }
}
Finally lets add the main function. Here we define the loop using emscripten emscripten_request_animation_frame_loop method.
webpack-emcc.cpp
int main() {
    printf("Hello emscripten from C++\n");

    // Run main loop
    emscripten_request_animation_frame_loop(loop, 0);

    return 0;
}
Exported functions have to be added to sEXPORTED_FUNCTIONS flag to indicate emscripten they have to be added to the Wasm module. Add it to CMAKE_CXX_FLAGS variable.
-sEXPORTED_FUNCTIONS=_main,_registerFunctionPointer_updateTimer,_convertStringToAscii
There are two important things you may have noticed about sEXPORTED_FUNCTIONS flag.
First, all C++ exported functions are written with underscore _ prefix. That's a emscripten requirement for this flag. Don't worry, in javascript we will call them without underscore.
Second, we are exporting main function as well. In this way we are indicating emscripten to execute main function on Module() creation.
Now we have the Wasm module ready for our project. Delete cache and reconfigure, then build.
Typescript implementation
The last stage of our project is to implement the interactions between Wasm, javascript and HTML. Javascript is an intermediary here between HTML and Wasm. It just makes the job to send data to Wasm, receive the result and set it back in the HTML.
First lets define the variables. We will store HTML elements and C++ wrapped functions. We are also defining a function to store the HTML elements. Add this code to app.ts:
app.ts
/**
 * HTML elements
 */
 let htmlCurrentTimerValue: HTMLElement
 let htmlInputBox: HTMLInputElement
 let htmlInputButton: HTMLElement
 let htmlWasmResult: HTMLElement

/**
 * Wrapped functions imported from C++
 */
 let registerFunctionPointer_updateTimer: (id: string) => void
 let convertStringToAscii: (text: string) => number

 /**
 * Get HTML elements
 */
  const getHTMLElements = (): void => {
    htmlCurrentTimerValue = document.getElementById('current-time-value')
    htmlInputBox = document.getElementById('input-box') as HTMLInputElement
    htmlInputButton = document.getElementById('input-button')
    htmlWasmResult = document.getElementById('wasm-result')
}
Now lets define what the input button click will do. It will get the input box text and send it to convertStringToAscii C++ function. Then we get the resulting pointer (malloc allocated buffer in C++), iterate over it as many times as characters have the string, getting each value with emscripten getValue runtime method as i32 data type (unsigned int in C++), and adding each ASCII code to the HTML element property htmlWasmResult.textContent.
app.ts
/**
 * Input button click
 */
const inputButtonClick = () => {
    const str = htmlInputBox.value
    const ptr = convertStringToAscii(str)
    htmlWasmResult.textContent = ""
    for ( let i = 0; i < str.length * 4; i += 4) {
        htmlWasmResult.textContent += wasmModule.getValue(ptr + i, 'i32') + ' '
    }
}
Initialize HTML elements back in getHTMLElements function:
app.ts
 /**
 * Get HTML elements
 */
  const getHTMLElements = (): void => {
    htmlCurrentTimerValue = document.getElementById('current-time-value')
    htmlInputBox = document.getElementById('input-box') as HTMLInputElement
    htmlInputButton = document.getElementById('input-button')
    htmlWasmResult = document.getElementById('wasm-result')

    // Initialize elements ⬇️
    htmlInputBox.value = 'Test me!'
    htmlInputButton.onclick = inputButtonClick
}
Add updateTimer function. This function is exported to Wasm and used from the C++ code. It receives the current timer value and set it up in htmlCurrentTimerValue.innerText HTML element property:
app.ts
/**
 * Update timer value from milliseconds in HTML
 */
const updateTimer = (milliseconds: number): void => {
    let mms = Math.floor((milliseconds % 1000) / 100)
    let sec = Math.floor((milliseconds / 1000) % 60)
    let min = Math.floor((milliseconds / (1000 * 60)) % 60)
    let hours = Math.floor((milliseconds / (1000 * 60 * 60)) % 24)

    htmlCurrentTimerValue.innerText = `${hours}:${min}:${sec}.${mms}`
}
Finally add the calls inside the resulting Module() promise. What we do here is:
-
initialize HTML elements calling
getHTMLElements -
wrap the C++ function
registerFunctionPointer_updateTimerusing the runtie methodcwrap('void' return type and 'string' argument type) -
wrap the C++ function
convertStringToAscii('number' return type for the pointer and 'string' argument type) -
export
updateTimerto Wasm using runtie methodaddFunction, get itspointerand register it in C++ callingregisterFunctionPointer_updateTimer(how to).
app.ts
/**
 * Create Wasm module (returns a Promise), then start the app
 */
 Module().then((module: WasmModule) => {
    // Wasm module object
    wasmModule = module
    console.log("Wasm module:", module)

    // Get HTML elements ⬇️
    getHTMLElements()

    // Wrap exported functions from C++ ⬇️
    registerFunctionPointer_updateTimer = module.cwrap<(id: string) => void>('registerFunctionPointer_updateTimer', 'void', ['string'])
    convertStringToAscii = module.cwrap<(text: string) => number>('convertStringToAscii', 'number', ['string'])

    // Export function to wasm module allowing using it from C++ code ⬇️
    const importedFunctionId = module.addFunction(updateTimer, 'vi')
    registerFunctionPointer_updateTimer(importedFunctionId.toString())
}).catch(error => {
    console.log("Error creating Wasm module:", error)
})
If you haven't done previously, build the Wasm module.
And we are done! it is time to run our project 😎
Test it!
Run the script npm run start.
If everything is right the timer should be being updated from wasm, and clicking the input button wasm converts the text into ASCII codes.

Also, building any time wasm module, webpack reloads the page on the fly, helping us a on testing stuff.
Building webpack
Running the script npm run build, webpack builds and creates dist folder, webpack also adds there the Wasm module as a dependency, naming it with an Id.
npm run build
Conclusion
As you can see, it is possible to use the powerful Visual Studio IDE to program and build a wasm module, and it is easily integrated by any browser or node project doing the right job with cmake.
I hope you enjoyed it as much as I did, and maybe it can help to develop more and better ways to create and improve our projects.


Oldest comments (0)